-
Open the New project dialog
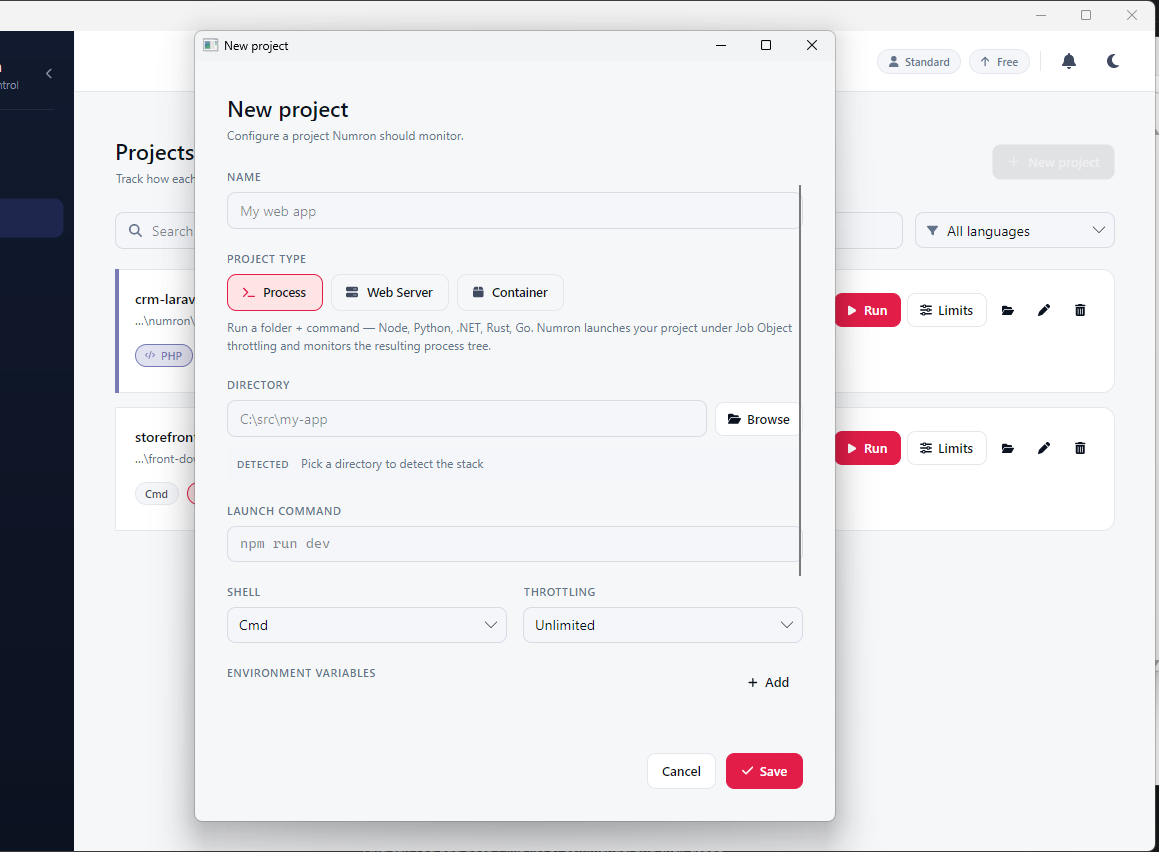
In the sidebar, go to Projects and click New project in the top-right. The dialog above appears. Nothing is saved until you press Save, so you can explore the fields freely.
-
Choose a project type
The project type tells Ambih how to launch and monitor your app. Pick the one that matches how you run it:
- Process — a folder + command (Node, Python, .NET, Rust, Go). Ambih launches it under Job Object throttling and monitors the resulting process tree. This is the default and the right choice for most dev servers and scripts.
- Web Server — a process that exposes an HTTP port, so Ambih can also surface request-facing health alongside resource use.
- Container — a containerized workload, monitored through its container runtime rather than a local process tree.
-
Point it at a directory
Click Browse and pick your project's root folder, or paste the path. As soon as Ambih has a directory it inspects it and, under Detected, names the stack it found (Node, .NET, Python, …) and suggests a launch command. The leaf folder name also becomes the default project Name — change it to whatever reads best in your project list.
-
Set the launch command, shell and throttling
The Launch command is what Ambih runs to start your app — e.g.
npm run dev,dotnet run,python app.py. It is pre-filled from detection; edit it if your entry point differs.Pick the Shell the command runs in (Cmd, PowerShell, bash, …) and a Throttling profile. Leave throttling on Unlimited to measure your app's natural footprint first; apply a CPU/RAM cap later once you know what "normal" looks like.
-
Add environment variables and save
Under Environment variables, click + Add for each key/value your app needs at launch (database URLs, API keys, feature flags). They are passed to the process and never leave your machine.
Press Save. The project appears in your list with Run, Limits, edit and delete actions. Hit Run to start your first monitored session — within seconds you'll see live CPU, RAM, disk and network, and after a few runs Ambih starts scoring each session against your history.
Field reference
Every field in the New project dialog, at a glance:
- Name
- How the project appears in your list and in CLI output. Defaults to the directory's leaf name.
- Project type
- Process, Web Server, or Container — how Ambih launches and monitors the app.
- Directory
- The project's root folder. Drives stack detection and is the working directory for the launch command.
- Detected
- The stack Ambih inferred from the directory (read-only). Pick a directory to populate it.
- Launch command
- The command Ambih runs to start the app. Pre-filled from detection; fully editable.
- Shell
- The shell the launch command runs in — Cmd, PowerShell, bash, zsh.
- Throttling
- CPU/RAM cap profile enforced via a Job Object. Unlimited by default.
- Environment variables
- Key/value pairs passed to the process at launch. Stored locally.